

How to Create an Enclosed Outdoor Sunroom Without Permits or Contractors
How to Create an Enclosed Outdoor Sunroom Without Permits or Contractors
Here’s what most homeowners get wrong: they assume adding a sunroom means structural work, permits, and a contractor invoice that starts at $15,000. That’s true for a permanent addition bolted to your house. But a freestanding enclosed outdoor room — built around an aluminum-frame hardtop gazebo with sliding glass doors — is a completely different category. No permit in most zones. No contractor. And you can set it up in a weekend.
This guide walks you through exactly how to do it, from measuring your space to furnishing it like an actual room you want to spend time in.
Why Traditional Sunroom Advice Leads You Astray
The home improvement industry pushes permanent sunroom additions because that’s where contractor money lives. HGTV shows you sprawling glass rooms bolted onto the back of a house, framed in wood, wired for electricity, and tied into HVAC. The average cost in the US? Between $25,000 and $80,000, according to HomeAdvisor 2025 data. Nobody in that world has a financial incentive to tell you there’s a cheaper path.
Nobody talks about the freestanding alternative.
A hardtop gazebo with full floor-to-ceiling enclosures functions as an outdoor room — but it’s technically classified as a temporary structure. That distinction matters legally. In most US counties, freestanding structures under 200 square feet (a 12×12 is 144 sq ft) don’t require a building permit. Always check your local municipal code, but this is the standard in the majority of residential zones across the country.
The concern people raise: won’t it feel cheap or flimsy? That criticism applied to fabric-and-pole gazebos from a decade ago. Modern all-aluminum hardtop units are a completely different product. A quality one uses 3-inch aluminum columns, a powder-coated double-layer steel roof panel, and tempered glass or high-grade polycarbonate sliding doors. They don’t flex in wind. They don’t fade after one summer. The gap between what people imagine and what these structures actually deliver is significant.
There’s another misconception worth addressing directly: people think enclosed gazebos are warm-climate-only products. The solid aluminum frame and double-layer roof on a quality hardtop handle standard snow loads and 40+ mph wind. The sliding glass doors keep out rain completely. You won’t heat it like a conditioned interior room — but it’s genuinely usable year-round in most climates with a portable heater, which costs $90, not $8,000 in HVAC work.
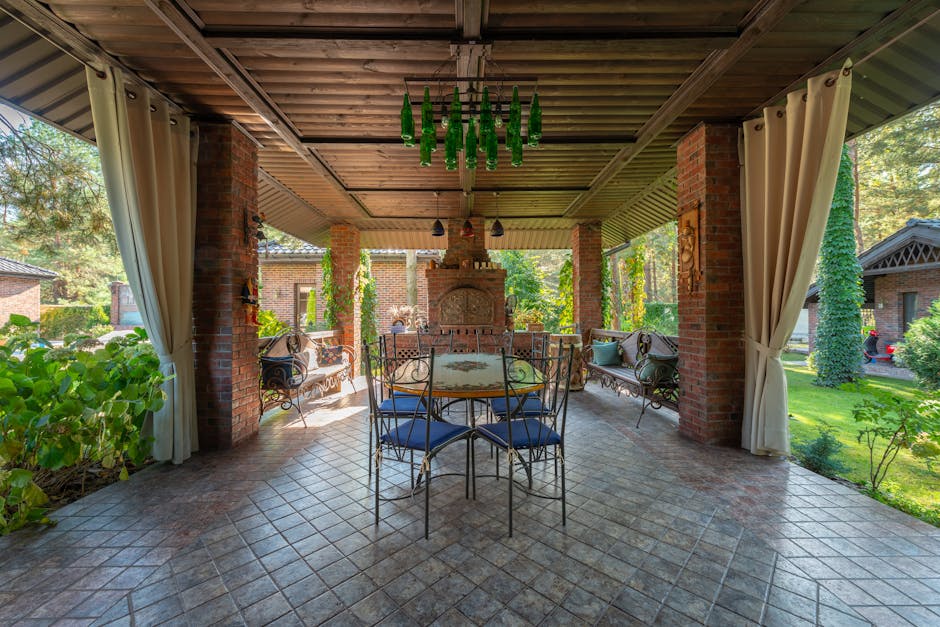
The final piece most homeowners miss: interior design is what separates a beautiful outdoor sunroom from an expensive equipment shed. A bare gazebo on a concrete slab looks like a carport. That same structure with outdoor-rated flooring, scaled furniture, layered lighting, and textiles looks like a real room. The structure creates the shell. Your design choices create the space. Both matter equally.
12×12 vs. 10×12 — Which Size Actually Fits Your Space?

Before buying anything, measure twice. The size difference between a 10×12 and a 12×12 sounds minor — it’s 24 square feet — but it determines what furniture configurations actually work inside.
| Feature | 10×12 ft (120 sq ft) | 12×12 ft (144 sq ft) |
|---|---|---|
| Price | $2,519.99 | $2,699.99 |
| Fits a 3-seat sofa? | Yes, with limited side clearance | Yes, comfortably |
| Fits a 6-seat dining table? | No | Yes (tight but workable) |
| Fits a daybed or chaise? | Yes | Yes, plus room for side tables |
| Best use case | Lounge, reading room, small dining | Multi-purpose: dining, lounge, workspace |
| Minimum clear area needed | 14×16 ft | 16×16 ft |
| Assembly time (2 people) | 6–8 hours | 7–9 hours |
| Price difference | — | +$180 |
The logic is straightforward: if you want a dining table in the space, the 12×12 is the minimum viable size. If this is primarily a reading room, lounge, or meditation space, the 10×12 is plenty — and $180 cheaper. Measure your actual patio or deck, subtract 2 feet on each side for door swing and clearance, and that tells you which footprint fits.
Step 1 — Prepare Your Surface Before Anything Else Gets Delivered
This is where most outdoor room projects stall. The gazebo frame requires a level, stable surface. Here’s exactly what to do depending on what you’re starting with:
- Existing concrete patio: Check level with a 4-foot bubble level across multiple directions. If it’s off by more than ½ inch across the span, use Quikrete Self-Leveling Floor Resurfacer ($28 at Home Depot, covers 45 sq ft at ⅛ inch depth). Let it cure 24 hours minimum before assembly begins.
- Existing wood deck: Most standard decks are close enough to level already. Check your load capacity first — a 12×12 aluminum hardtop frame weighs roughly 350 lbs empty. Add furniture and people and you’re looking at 700+ lbs concentrated load. Decks framed with 2×10 joists at 16 inches on center handle this without issue. If the deck is older or shows any bounce, spend $200–$400 on a structural engineer’s inspection. Worth it.
- Grass or bare ground: You need a solid base. Option A: pour a 12×12 concrete pad (approximately $1,200 with a contractor, or $380 DIY using 60-lb Quikrete bags at roughly 74 bags). Option B: lay VEVOR interlocking patio deck tiles ($1.80 per tile, sold in packs on Amazon). The tile method takes 3 hours, needs no curing time, and is fully reversible if you ever move.
- Sloped yard: If your yard slopes more than 3 inches across the gazebo footprint, concrete is the only reliable option. A sloped base causes sliding door tracks to bind and roof panels to misalign — both problems are extremely annoying to fix after the structure is assembled.
Use the anchor bolts that come with the hardware package. Every major gazebo manufacturer includes them for a reason. An unanchored 350-lb aluminum structure in a 45-mph gust becomes a projectile. This is non-negotiable.
Step 2 — Assemble Your Hardtop Enclosure Structure
The GarveeLife 12×12 ft hardtop gazebo is the specific unit I’d point most homeowners toward for this project. Here’s what makes it work where cheaper alternatives fall short.
What “All-Aluminum Frame” Actually Means for Longevity
Aluminum doesn’t rust. That sounds obvious until you look at competing units that use a steel frame with aluminum cladding — those rust at every cut edge and fastener point within two or three rainy seasons. The GarveeLife frame uses solid hollow-section aluminum columns (3-inch diameter) with a powder-coat finish throughout. No steel hidden inside. No rust. No repainting required in year four.
The roof uses a double-layer steel panel construction — not a single-skin sheet. This provides meaningful thermal insulation. On a 90°F summer day, the interior temperature under a double-layer roof runs 8–12°F cooler than under a single-skin alternative. That difference determines whether this space is genuinely comfortable in July or just technically enclosed.
The Floor-to-Ceiling Sliding Doors Are the Feature That Earns the Price
This is what makes an enclosed sunroom gazebo a different product category from a standard open pergola or a pop-up canopy. The GarveeLife design includes full floor-to-ceiling sliding glass panels — not half-height panels with an open gap at the top, not mesh screen walls that bow in the wind, and not removable curtain panels that require storage. The sliding doors are aluminum-framed with tempered glass and run on recessed floor tracks. When closed, the interior stays dry and insect-free in a rainstorm. Open them fully on a clear day and you have an open-air room. That dual-mode flexibility is the functional point of this entire setup.
Assembly takes two people. Plan for 7–9 hours on the 12×12 unit. Bring a power drill, a rubber mallet, a 4-foot level, and snacks. The instruction manual labels every hardware bag by step number — it’s clearer than most flat-pack furniture. No special skills needed, but do not attempt solo. The roof panels require two sets of hands to lift and position safely.
The 10×12 Option for Tighter Spaces
The GarveeLife 10×12 at $2,519.99 uses identical materials and the same sliding door system. The only difference is the 2-foot reduction in width. For a compact urban backyard or a patio that maxes out at 14×16 feet of usable area, this is the right call — and you’re not compromising on build quality to save the $180.
Step 3 — Design the Interior as a Real Room
The single biggest mistake people make after assembly: treating this like outdoor furniture storage rather than an actual room. Buy indoor-grade pieces rated for outdoor use, not afterthought patio sets.
Start with the floor. Your concrete or tile base is functional but cold-looking. Layer an outdoor-rated rug over it — the Safavieh Courtyard Collection has options at 9×12 and 11×15, available at Home Depot for $89–$140. This one change makes the space read as a room rather than a structure. Add it before you bring in any furniture.
Furniture Sizing for 144 Square Feet
A 12×12 has roughly the same footprint as a small bedroom. Scale matters exactly the same way. Too large and the space feels cramped; too small and it looks like you staged a dollhouse. Specific pieces that work:
- Sofa: The IKEA ÄPPLARÖ outdoor 3-seat sofa ($449, 87 inches wide) sits against one wall with 3 feet of clearance remaining on each side. Holds up in humidity and direct sun without fading.
- Coffee table: Keep it under 48 inches long. The Best Choice Products Acacia Wood Outdoor Coffee Table ($129, 47 inches) is the right size and weather-resistant without looking cheap.
- Dining setup: A 36-inch round table seats four people comfortably and preserves walking clearance. The IKEA ÄPPLARÖ round table ($229) locks in at the right footprint.
- Side tables: One per seating position. The COSCO Outdoor Living Aluminum Side Table ($45 each) folds flat when not needed — useful in a space this size.
- Daybed option: If you want a lounge layout instead of a sofa, the Keter Pacific 3-position sun lounger ($180) doubles as seating and reclines to nearly flat. Two of these facing each other work better in a 10×12 than a traditional sofa arrangement.
Lighting the Space for Evening Use
The gazebo has no built-in electrical, so work with weatherproof plug-in options. The Brightech Ambience Pro outdoor string lights ($50, IP65 rated) run on a standard extension cord and create a warm ambient glow across the full ceiling line. For task lighting at a reading chair or dining table, the TaoTronics LED outdoor floor lamp ($65, weatherproof to IPX4) plugs into the same extension cord and provides focused light without harsh overhead glare.
Run a single 12-gauge weatherproof extension cord from your nearest exterior outlet to the space. Plug a Belkin outdoor power strip ($35, surge-protected and weatherproof) into it. This cleanly handles lights, a fan, and phone charging from one cord entry point.
Common Questions After the Structure Is Up

Can You Actually Use This in Winter?
In climate zones 7 and above (roughly the mid-Atlantic and southward), yes — with a portable heater. The Mr. Heater F232000 MH9BX portable propane heater ($90 at Walmart) outputs 9,000 BTU and keeps a 12×12 space comfortable down to about 35°F outside temperature. Below that, you’re fighting physics in a non-insulated structure. In colder zones (New England, the upper Midwest), treat this as a genuine three-season room — March through November is still a significant extension over an open patio.
How Much Ongoing Maintenance Does an Aluminum Frame Require?
Almost none. Wipe down the frame once per season with mild dish soap and water. Spray the sliding door tracks with WD-40 Specialist Silicone Lubricant ($8 at any hardware store) twice a year — spring and fall. Check and retighten the anchor bolts each spring after freeze-thaw cycles. That’s the complete maintenance list. No staining. No sealing. No repainting. It’s the primary practical advantage of aluminum over wood-framed structures.
Does This Add Resale Value to the Home?
A freestanding structure doesn’t add to your appraised square footage, so the ROI math isn’t the same as a room addition. What it does add: strong visual impact in listing photos, a functional outdoor feature that buyers notice and remember, and an estimated $3,000–$5,000 in perceived lifestyle value based on Remodeling Magazine’s 2025 outdoor project data. It’s not a pure investment vehicle — but in a competitive housing market where outdoor living space is a genuine selling point, it’s not money that disappears either.
The Verdict
If your available outdoor surface is 16×16 feet or larger, buy the GarveeLife 12×12 enclosed hardtop gazebo and commit to the $180 upgrade over the 10×12. The extra 24 square feet gives you a furniture layout that actually breathes. Add the Safavieh Courtyard rug ($120), the IKEA ÄPPLARÖ sofa ($449), the Brightech string lights ($50), and a Mr. Heater for cold evenings ($90). Total spend lands under $3,560 — for a usable outdoor room that functions from early spring through late fall, requires almost no maintenance, and goes up without a single permit application.
